Showing posts with label DIY. Show all posts

Monday, October 3, 2011

Pumpkin Alternatives

It's Fall, ya'll! And not only is it fall, but now it is officially October...less than a month away from Halloween! Last year hubs and I went to a pumpkin patch and picked out a few small pumpkins to take home. It was a lot of fun, but it would have been more fun with little ones. It also would have been fun to pick out a big pumpkin but no one would ever see it but us! We don't even have an outside entrance to our place, so really...carving a pumpkin is just not happening. But, this year I am strongly considering one of these not-so-typical ways of decorating a pumpkin. I'm very into GOLD right now, so I'm definitely leaning toward something gold. So many choices!! Which ones are your favorites?

{via Tiny Prints blog}

{via Pinterest}

{via Budget Wise Home}

{via Pinterest}

{via Southern Living}

{via Imgfave}

{via Good Housekeeping}

{via BHG}

Lace Covered Pumpkin via BHG


Gold Thumbtack Pumpkins via Madigan Made

Thursday, June 2, 2011

DIY Ottomans

This update is long {long} overdue. I just hadn't taken any pictures yet. Way back {in November} I posted a quick peek at the progress I had made on my ottomans but never posted about the finished product!


I started with these ottomans {from K-Mart!}

And then I stayed up all night removing the horrible fabric, tufting buttons and staples...
the second one went a lot faster but my hands were bruised for days!


I used the same foam cushion but covered it with new cotton batting and this fabric from premier prints


Next time I think I will use a pattern that is more forgiving if the fabric doesn't go on perfectly straight.


I'm still playing around with different trays to use on top for a flat surface

So, {considering this is the very first re-upholstery job I've ever done...} What do you think?!

Tuesday, November 30, 2010

One down, One to go!

I stayed up entirely too late last night (or early this morning if you want to be technical) doing this:

But, once I started I just couldn't stop. It's a disease. I didn't think it would take as long as it did! And I completely destroyed my hand (owie). And I still have a second frame to do! ...But in a few days it will allllll be totally worth it when my ottomans are finished!! Can't wait to show you!

Tuesday, October 26, 2010

Two Birds: One Stone

I killed two birds with one stone and I'm going to show you how I did it. (Not literally, I promise!)


My desk at work (at my "9 to 5" job ...which is NEVER 9:00 to 5:00 so why do I call it that??) is a desk in an open area. It sits outside my office with a window and a door that closes (where I only sit about once or twice a week). I can't keep a plant or real flowers at this desk because there's no sunlight and they would die very quickly so I have had the same fake flowers on my desk for almost 8 years. Well, maybe only as long as I've been in my current building so let's say 5 years. Needless to say, I have grown tired of these flowers. They are also orange and don't go with my stuff unless my Autumn and Halloween decorations are out. So, I gave them to a co-worker.


I have another problem which I'm sure a lot of people can relate to. Being that I'm in an open area, people always steal my stuff (mostly pens). I try to keep a separate stash of pens and pencils I don't care about so that when they disappear I don't care as much - but it gets expensive because I constantly have to replace them. And since I'm OCD, they have to match the decor so they can't be any old pens or pencils.


My solution:


I made flower pens! They are great! I have to admit, I don't like them separately because they look a little juvenile. But when grouped together, they look like a pretty decent bunch of (fake) flowers! Now, when people "borrow" a pen, most of them are guys and won't want to hang on to it. The rest of them who do take it, won't be able to claim it's theirs when I catch them with it!


Start off with regular stick pens. DON'T use click pens!
Cut the stem of the flower to the length you prefer. I tried several different lengths but never past the soft grip of the pen.

Use floral tape (I used green to make it look more like a flower stem) and wrap the pen and stem closely together...all the way down to the end of the stem and all the way back up to the top.
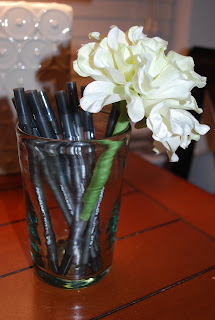


et voila! It's that easy!

Repeat until you have enough flowers to fill a cup or vase. If you want the look of an arrangement, it would be better to use different pens of different lengths. I used the same pens so they would match.
The finished product resting on my Colin Cowie Bible.
(Seriously, the book is my hostessing, organizing BIBLE)

Wednesday, October 6, 2010

Mea Culpa

So, I had a super cute Fall craft project planned and I sat down to complete it Monday evening. It turned out really well and I took step-by-step pictures with the SLR so I could share with you! (I finally found the batteries and charger!) Just before bed, I got the camera out to review the pictures and discovered that I had no memory card in the camera and therefore, NO pictures. FAIL.


So, I put the memory card in and took one picture the next morning so you can get a sneak peak. I'll just have to do the project again so I can get some pictures to post!

Tuesday, September 21, 2010

DIY Memories

While we are in our temporary living quarters, all our belongings prior to married life are crammed into two large storage units. Everything from the wedding and all our wedding gifts are in a third storage unit, otherwise known as "Mom and Dad's basement"...thanks M&D!! I took a trip to our storage unit after work today to unload a few things and it was good to see some of my stuff! Oh, who am I kidding, I can't SEE any of it. As I unloaded my trunk, I was reminded of some of the fun DIY stuff we did for the wedding. I'll have to post details on our projects but I'm waiting for the professional photos to come back I guess. One of my favorite things (and most time consuming projects!!) is our cake stand.
Yep, we made this beauty! I'm so proud of how it turned out and I love that we can continue to use it. (sorry for the poor quality picture. I went to the storage unit when it was dark and I used my camera phone to snap the photo!)


I will post the step-by-step later but for now, this is what we started with:

And look at how good it looks with our cake on top!


And can I just tell you how amazing our cake was? It was quite possibly the best cake I've ever had - no lie! Teri @ Cakes Unlimited in Charlottesville is a GENIUS!
I can't wait until our one year anniversary when we get to eat our top layer. And I'll let you guess what I'll serve it on!

(thx to Danny for the 1st cake pic and Kat N. for the bottom pic!)

Related Posts with Thumbnails